
While designing a document, you can organise the design elements like Symbols and Styles in Sketch easily. Let’s assume that you are working on some UI design project. Everything is going well; you have created buttons, forms, cards, a navigation bar, and so on. At a certain point, you realise that you’ve designed the same button many times, say twelve times. Each one looks slightly different because of padding, mismatch of colours, and inconsistent font size.
When your client asks for a small update in that button’s colour, you have to go back and edit all those twelve buttons one by one. It’s tedious, a waste of time, and frustrating too, doesn’t it? Have you ever faced such situations? Actually, you’re not alone when you come across such a situation. Many of us face this challenge. It becomes quite frustrating when we are working on large projects. But do you know that we can now avoid this chaos by using features of Symbols and Styles in Sketch?
Table of Contents

Importance of Symbols and Styles in Sketch
In Sketch, Symbols are reusable components. Instead of designing the same button one by one, you can create a button symbol and reuse it across your project. So, if you have to make some changes in this button symbol after certain feedback, you only have to update that symbol, and all instances of it will update automatically. It is cool, isn’t it?
Whereas Styles are like a manual of your design. That defines how the text, colours, and layer properties you can apply throughout your project. This ensures consistency in your design with any guesswork.
In this way, Symbols and Styles help you to create not only consistent designs but also help you to make your designs scalable. It doesn’t matter what size of project you are working on—small or large; these features will save you a good number of working hours. Your designs will look polished and professional.
By the end of this article, you will have a solid understanding of Symbols and Styles and how to use them in your design projects. Get ready to transform the way you design. Let’s dive in.
What Are Symbols in Sketch?
Symbols are the powerful building elements of Sketch drawings. These are reusable parts that you can use repeatedly in your project. Any graphic can be converted into a symbol to be used repeatedly across all your designs. It will help you to maintain consistency across designs. Also, you can easily update the multiple instances of the symbol.
Creating and Using Symbols
However, symbols are essential to design systems and are not merely used to save time. A design system is a set of rules, norms, and reusable parts that assist teams in producing designs that are coherent and consistent. Because they guarantee that every element of your design, be it a button, an icon, or a header, appears and functions the same throughout your project, symbols are the foundation of any design system.
How to turn a design into a symbol?
A Symbol can be created by selecting a group or an Artboard, or by selecting multiple layers and then choosing Layer > Create Symbol in the menu bar, or by pressing ⌘Y on your keyboard. Then name your symbol, as shown in the image. Here you will also get an option at the bottom of the window that says whether to send the source version of your newly created symbol to a separate Symbols page or keep it on the same page you’re currently working on.


When a symbol is being created, you create a source and an instance of it simultaneously. You can create as many instances of the same symbol as you want, but there will be only one source. So if you make a change to your source symbol, then it will be reflected in all instances of that symbol in your document.

Basically, when you reuse your design in your document, then it is recommended that you turn that design into a symbol. So that you can use your design in an organised way.
Organizing symbols in the Symbols page
While organising your symbols, you should take little time while naming them. Instead of Sketch’s default naming pattern, you always choose to give a meaningful name to your symbols. You can ask me, What is the benefit of doing this?
Actually, to organise your symbols in your document library, it is recommended that you follow some standard. I will suggest using Block-Element-Modifier (BEM) naming methodology. It is easy to use and an established pattern after all. But you can invent one for yourself; there is no such hard and fast rule that you should follow the same what I mention here.
Let me explain in a few lines how you can use BEM in organising your document’s symbols. You have designed a button. This button is called a Block (B). It has its own identity. Then a button can consist of some Elements (E), like an icon or a label, and a border. Again, these elements can have some variants in terms of their colours, states like active and disabled, size, and positioning. These are known as Modifiers (M). So, a button can be named as button/icon/aligned-right or button/label/small, and so on.
How to override symbol instances for customisation?
Sketch facilitates overriding symbols’ instances in many ways. Let’s take a button once again. Now, you can override properties of the button symbol in the following ways:
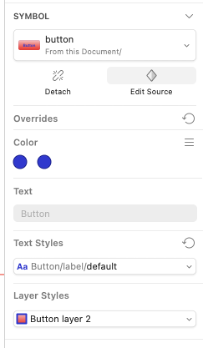
- Overriding Text Style: It can be done in two ways. First, you can swap the text-styles created earlier. Second, you can override the text-style through the layer’s text properties.
- Overriding Layer style: It can be done in two ways. First, you can swap the layer style for through another layer style created earlier. Second, by overriding the style attributes of the layer for that symbol.
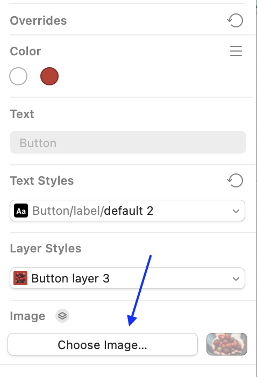
- Overriding images: In a symbol, you can override image as well. It can be achieved through ‘Fill’ property. First, you must have used an image through the ‘fill’ property. Then while overriding the image just choose a new image there and that’s it. Your symbol would have a new image now.


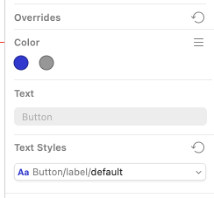
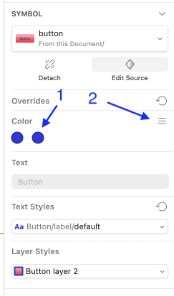
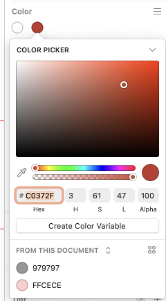
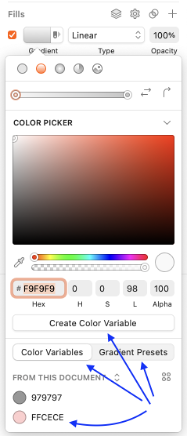
- Overriding Colours: The colours used in a symbol are listed under override section on the right of the design document. Point#1 and Point#2, mentioned in the attached image, are showing the colours used and grid-view option respectively. Then, select the colour you want to change. The colour window will open where you can select a new colour for your symbol.
There are some more overriding features you can find in a symbol. LIkewise, you can limit the properties of the symbol to be overriden by locking those properties. Locked properties can not be changed.
What Are Shared Styles in Sketch?
In Sketch, a shareable style is a reusable style that can be used across your design document that insures consistency in your designs.The shareable styles can categorised as text styles, layer styles and color styles.
These shared styles help us in maintaining the visual consistency by using pre-defined typography in terms of text styles, theme colors and pre-defined set of components. All together these are considered as a cohesive and recognizable brand identity.
There are many benefits of using shared styles during UI development phase.
- Faster design iterations: These shareable styles help designers to make quick changes without updating each instances manually.
- Easy global updates: It is much beneficial when working on a large project. A single update to a shared style propagates across the entire project instead of modifying styles one by one.
- Improved collaboration with teams: Designers and developers can work seamlessly using shared styles that ensures everyone is aligned with the latest design guidelines. That reduces inconsistencies in UI elements and making handoffs more efficient.
Creating and Applying Shared Styles
- How to create text styles (e.g., headings, body text, captions)
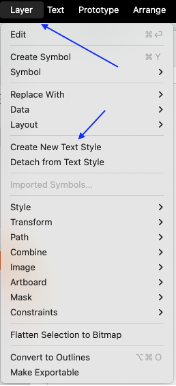
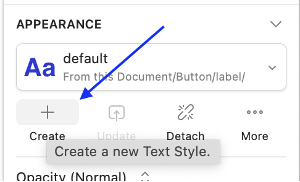
- There are two ways to create a text style. As the first option, select the text in the design, go to Menu > Layer > Create New Text Style. You will be asked to name the text style in the property panel on the right. Second option is by clicking the create ‘+’ button, located under ‘Appearance’ in the same right property panel, and enter the new name for the text style.
- How to create layer styles (e.g., button backgrounds, shadows, borders).
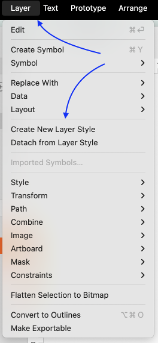
- There are two ways to create a layer style. As a first option, select the layer in the design, go to Menu > Layer > Create New Layer Style. You will be asked to name the layer style in the property panel on the right.

- How to create and manage colour styles.
- Colour styles are known as “Color Variables” in Sketch. All colours and gradients in the document can be saved as the Colour variables. These colour variables can be used across the project. On making changes to these variables, these changes appear across all such elements used in the design document.
Advanced Tips and Tricks
Symbols and styles can be used together to create a complex components. For example, a navigation bar with nested buttons and icons. The button can have multiple styles as per its multiple states like active, default and disabled. These states can be easily handled using corresponding styles to change the appearance of the button as per the state. The icon, used in button, can also be modified using the same approach.
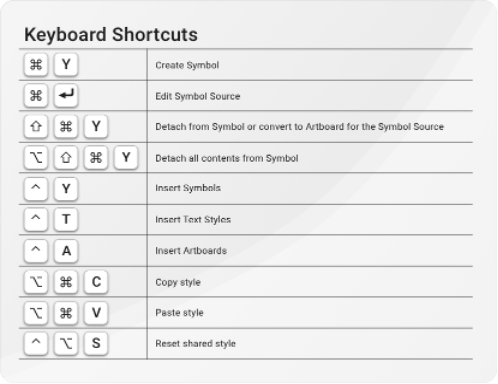
Use overrides properties of a symbol to create new component by modifying the styles. Again, you can also use the design file as a library so that these assets can be available to other Sketch files. You can learn some common keyboard shortcuts for faster symbol and style management. A few of them are listed below:
Common Mistakes to Avoid
It is necessary to use symbols and styles effectively and wisely. You can follow these steps to avoid some common mistakes while using them:
- Avoid creating too many nested symbols;
- Must follow some naming conventions for better collaboration like BEM;
- Use these shared Symbols and Styles globally to avoid inconsistencies;

Conclusion
The features like Symbols and Styles in Sketch helps to maintain your designing assets in an organized way. If you have not started yet to use these Symbols and Styles then I will suggest to implement them in the early stage of your designing project. This approach will save a lot of time and effort of you and your team. And if you have already been using this, feel free to share your favorite tips how you using Symbols and Styles in your project in the comments below so that others can learn from you. Thank you for being with me till the end.
You may also like to read:
This article is incredibly helpful for beginners like me! It breaks down symbols and styles in Sketch so clearly, with practical tips like BEM naming. Really appreciate the examples and explanations—they make a big difference in understanding how to build scalable designs efficiently.watchfootball
Thank you for your time and sharing your feedback here.